How to DIY a Game Room on a Budget Like a Total Pro
I turned an underused spare room into a gaming nook for about $320. Before, it was bright, echo-y, and full of cables. The room felt like a storage closet. I solved it by anchoring the layout, hiding cords, and layering warm light. The result feels intentional and cozy, not like a showroom.
This guide focuses on a modern-rustic gamer look: muted neutrals with LED accents. Budget: $250–500 if you’re starting from scratch; under $200 to refresh an existing setup. Works for basements, spare rooms, or small living rooms. Trend note: muted greys with ambient LED gives you calm focus and that gamer vibe without neon overload.
What You'll Need for This Look
Foundation pieces:
- 8×10 jute area rug in natural (~$120-180) — anchors seating and soaks sound.
- Linen-look curtains, grey, 84-inch (~$35-50 per panel; 2 panels)
Storage & furniture:
- White oak floating shelves, set of 3 (~$40-70) — for games and figures.
- Wooden pallet coffee table, low profile (~$15-35) — stackable and mobile.
- Pegboard wall organizer 24×48 (~$25-45)
Tech & lighting:
- Bendable LED strip lights 16ft multicolor (~$20-35)
- Warm LED table lamp with linen shade (~$35-60)
Comfort & acoustics:
- Chunky plaid throw blanket, 50×60, oatmeal (~$30-50)
- Euro pillow inserts 26×26 set of 2 (~$25-40)
- Acoustic foam panel 12-pack, charcoal (~$30-60)
Cable & finishing:
- Cable management raceway kit, 8 ft (~$15-30)
Budget-friendly swap: If real linen is out of reach try linen-blend curtains for half the price.

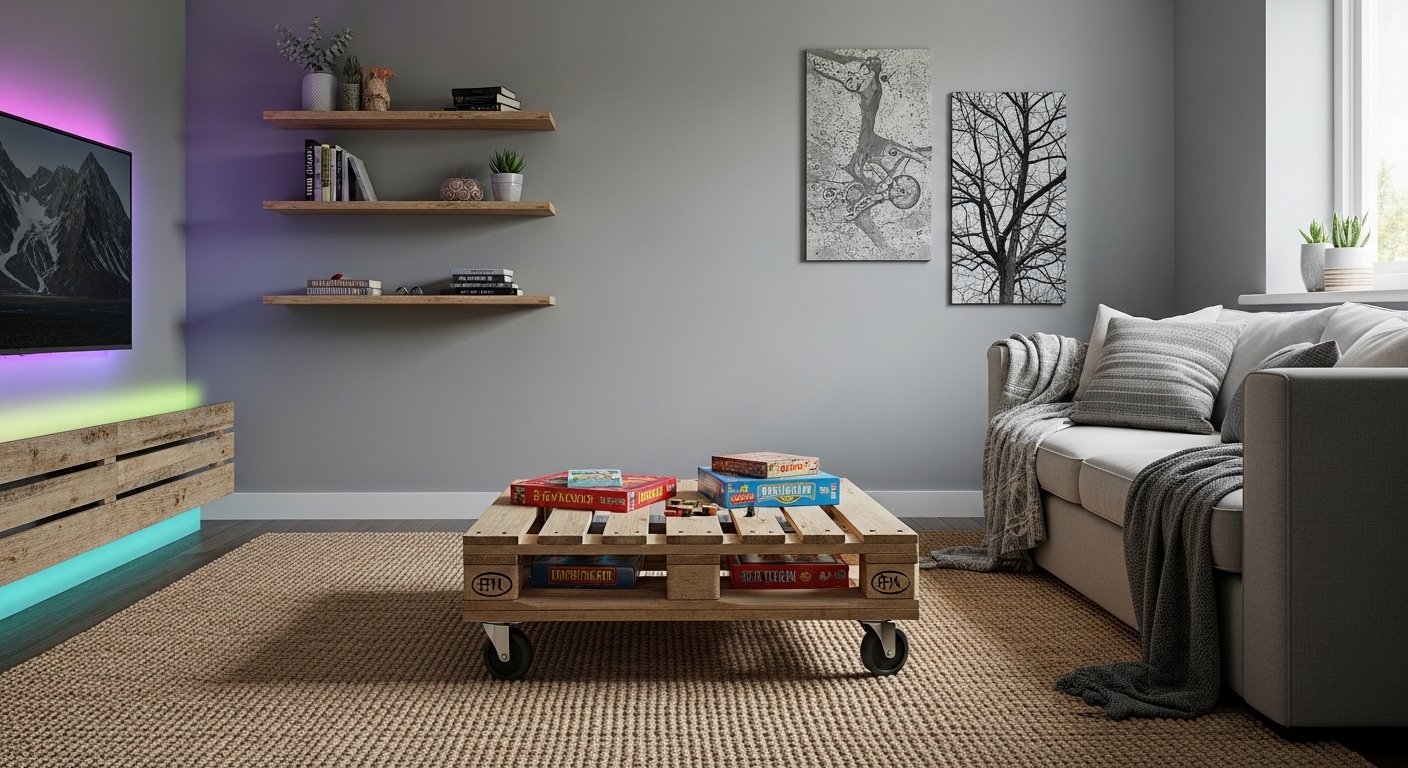
Start with the foundation: rug, seating, and layout

The rug sets scale. I used the 8×10 jute rug so the front legs of my sofa and side chairs sit on it. That small choice made the room read larger and anchored the gaming zone. Arrange seating so players face the screen with a 4-6 foot play area in front for board games or console controllers.
I paired the rug with linen-look grey curtains hung close to the ceiling. Hanging higher adds perceived height. Keep curtains long enough to just kiss the floor. A mistake I made: I first tried crisp black blinds. They looked harsh and made the room feel smaller. Grey fabric softened everything and improved acoustics.
Scale tip: choose seating where cushion height is 16–20 inches for casual lounging during long sessions. Use a pallet coffee table low to the ground for card games and snacks.
Hide clutter and gain space: mounts, pegboards, and reclaimed shelves

Clutter kills the pro look. I mounted the TV and ran cords into a cable raceway. For controllers and accessories, a 24×48 pegboard works wonders. Hooks and little shelves keep things visible but tidy. I saved money by swapping a metal shelving unit for white oak floating shelves. The wood warm up the grey walls.
Visual principle: vary depth and height. Put taller items at the back and items in odd-number groups. One thing that didn’t work: my first shelf arrangement used all same-size boxes. It looked monotonous. I corrected it by mixing stackable games, a small plant, and a framed print to break the line.
Create ambiance with layered LED and warm lighting

Soft, well-placed light reduces glare and improves mood. I started with a 16ft multicolor LED strip behind the TV. Set it to a muted blue or warm amber during long sessions. Add a warm LED table lamp with linen shade for side light that doesn’t compete with the screen.
Bulb temp matters. Use 2700–3000K for task/ambient lamps. Avoid bright overheads. In one early attempt I used a bright pendant and I noticed eye strain after two hours. Replacing it with layered lamps and LED backlight fixed that.
Add acoustic panels behind the screen if echo is a problem. I used a 12-pack of charcoal acoustic panels on the rear wall. They mellowed the bass and made chat audio clearer during streams.
Common Styling Mistakes to Avoid
Mistake: Choosing a rug that’s too small
Why it doesn't work: The space feels chopped and inefficient.
Do this instead: Get an 8×10 rug so front legs sit on it.
Mistake: Showing cables everywhere
Why it doesn't work: It reads cheap and noisy.
Do this instead: Use a cable raceway kit and tuck power bricks behind a shelf.
Mistake: All shelves at the same height
Why it doesn't work: The eye has nowhere to rest.
Do this instead: Mix shelf heights and use odd-numbered groupings. White oak floating shelves look modern and warm.
Shopping Guide: Where to Find These Items
- For budget lighting: check Amazon for bendable LED strips. They’re cheap and app-controlled.
- For shelving and wood tones: Home Depot or Amazon’s white oak floating shelves offer fresh finishes.
- For textiles on a budget: try linen-blend curtains and swap expensive pillow inserts later.
- For sound treatment: affordable acoustic panel packs improve audio for streams without drilling.

Start with the rug and LED backlight. Those two moves changed how the room feels and functions. I added the throw and shelves later and the space kept evolving. Which one will you install first? (If you want my exact LED settings, I’ll share them.)