

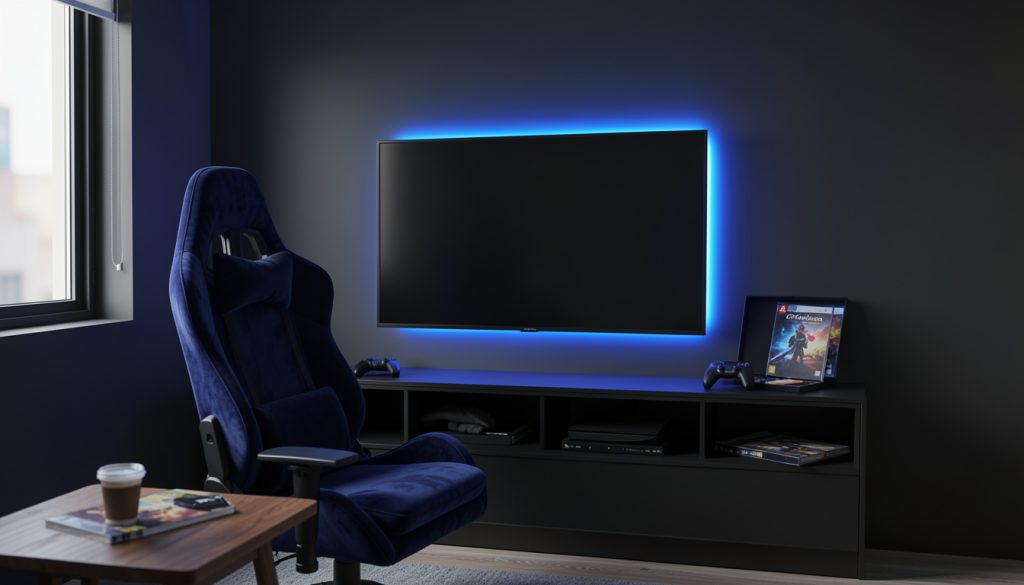

I used to have a bright, cluttered corner with my PlayStation shoved on a dresser. The room felt chaotic and the TV glare ruined late-night sessions. playstation room diy was supposed to be fun, but it became a stress project.
I redid it for under $250 using cheap LEDs, a rug anchor, and a few thrift finds. In this guide I’ll show the exact visual moves that changed the vibe into a focused, moody game room.
My aim was a bold, saturated PlayStation aesthetic: deep blues, charcoal, and electric LED accents. This works for small bedrooms, studio setups, or a dedicated corner.
Budget ranges from $150 to $450 depending on splurges. I noticed more people in 2025 mixing thrifted wood with tech finishes for a collected look.
1. Start with the Foundation: Layout and Rug Anchor


First, place a rug to define the play zone. A 5×7 rug worked in my small room; it kept the setup from floating against dark walls.
I used a low-profile Machine-washable navy area rug 5×7 to anchor the console and chair, and a slim Oak TV stand 48 inch for balance.
Principle: anchor with scale. The rug should tuck under the front legs of the seating and sit centered with the TV. Leave 6 to 12 inches around the rug edges for floor breathing.
Most people pick a rug too small. If your rug is undersized, the room will feel disjointed. Choose the larger size or layer a runner in front of the chair instead.
2. Build a Command Center: Desk, TV Stand, and Cable Flow


The command center is the visual core. I placed the TV at eye level when seated, about 40 to 44 inches from the floor for my 32 inch screen.
Pick a slim Matte black wall-mounted TV bracket and a Low-profile console shelf 48 inch.
Visual principle: horizontal lines read as stability. Keep devices grouped on one plane and use matching finishes like matte black or walnut to unify the tech.
Cable mess is the common eyesore. Use 2-inch spacing between devices, clip cables to the back edge, and hide power strips behind the shelf for a tidy silhouette.
3. Layer Mood Lighting with Cheap LED Tricks


This is the high-impact phase. I used under-$25 LEDs to set the PlayStation mood: cool blue behind the TV, warm backlight near shelves to create depth.
My go-tos were an RGB LED light strip 16ft and a USB LED backlight kit with remote.
Color theory matters. Pair electric blue with charcoal walls and a single warm accent so the LEDs pop without overwhelming the space.
People overdo color. If every surface has LED, the room reads chaotic. Instead, light two planes only: behind the TV and under the shelf. Aim for a soft halo about 1 to 2 inches off the wall.
4. Style Walls for Focus: Shelves, Art, and Controller Display


Walls sell the theme. I mixed a single framed console poster with two floating shelves at staggered heights for collectibles.
Use a Matte black gallery frame 16×20 set of 3 and an Acrylic controller display stand.
Visual principle: eye-level rule. Hang the primary art so its center sits about 58 to 62 inches from the floor. Shelves should be staggered with one at 48 inches and the next 12 to 16 inches above.
A common mistake is cluttering shelves. Keep one focal object per shelf and repeat materials like metal or ceramic for cohesion.
5. Finish with Texture and Cozy Seating


Seating makes the room playable. I chose a compact velvet chair for depth and a knit throw to soften the tech glare.
Anchor with Velvet gaming chair navy and a Chunky knit throw 50×60 inch.
Texture contrast is the visual key. Velvet next to matte black and oak keeps the room from feeling cold.
Don’t pick a chair that’s too big. Keep 18 to 24 inches between chair and TV stand for comfortable movement and sightlines.
Common Styling Mistakes to Avoid
Mistake: Mounting LEDs only on the TV front
Why it doesn't work: Creates glare and flattens the image.
Do this instead: Place an RGB LED light strip 16ft behind the TV for even halo lighting.
Mistake: Too many small art pieces around the console
Why it doesn't work: Competes with the screen for attention.
Do this instead: Use a Matte black gallery frame 16×20 set of 3 and keep spacing consistent.
Mistake: Choosing thin rugs for tech zones
Why it doesn't work: Looks cheap and offers no visual anchor.
Do this instead: Pick a Machine-washable navy area rug 5×7 to ground the space.
What You'll Need for This Look
Foundation Pieces
Machine-washable navy area rug 5×7 around $40 to $90
Oak TV stand 48 inch around $80 to $220
Textiles & Soft Goods
Velvet gaming chair navy around $90 to $250
Chunky knit throw 50×60 inch around $25 to $60
Lighting
RGB LED light strip 16ft around $12 to $30
USB LED backlight kit with remote around $10 to $25
Finishing Touches
Matte black gallery frame 16×20 set of 3 around $30 to $70
Acrylic controller display stand around $8 to $20
Budget Swaps
[Secondhand oak console from thrift store] similar at Goodwill or Facebook Marketplace (Amazon backup: Oak TV stand 48 inch)
Shopping Guide for This Look
Score LEDs on weekday sales: Many RGB kits drop price midweek. Try RGB LED light strip 16ft around $12 to $30.
Thrift hack: Hunt a small oak table at HomeGoods or thrift and pair with Oak TV stand 48 inch as backup.
2025 trend tip: Mix matte black with warm wood to balance bold LEDs; look for Matte black gallery frame 16×20 set of 3.
Splurge vs save: Splurge on seating like Velvet gaming chair navy if you game nightly; save on rugs with washable options.


Conclusion
Start with the light. A single LED halo behind the TV changed my room faster than any expensive piece.
Focus on scale, a dark neutral backdrop, and one warm wood element to keep the look grounded.
Which cheap LED or thrift find would you add first to your PlayStation setup?